Green forest nail ideas are inspired by nature, calm landscapes, deep woods, and fresh greenery. These nail designs bring together different shades of green, earthy textures, and natural elements like leaves, vines, moss, and wood tones. Forest-themed nails are perfect for people who love nature, outdoor aesthetics, or soft but stylish nail art. They work beautifully in all seasons, especially autumn, spring, and winter, when deeper green tones feel warm and grounding.
Forest nail designs can be simple or detailed. You can choose plain green shades, layered textures, or artistic patterns that reflect trees, leaves, and natural shadows. These designs suit short and long nails and can be adapted for casual wear, office style, or special occasions. Green forest nails are also popular because green symbolizes balance, renewal, and calm.
In this blog post, you will find ten clearly explained green forest nail ideas. Each idea includes preparation steps, required materials, design application tips, and maintenance advice. Whether you are doing your nails at home or visiting a salon, this guide will help you understand each design and choose what suits your style best.
1. Deep Pine Green Matte Nails
Deep pine green matte nails are a classic forest-inspired look. This design uses a dark green shade similar to pine trees found in dense forests. The matte finish gives a soft, natural appearance that feels elegant and calm.
Preparation starts with cleaning the nails thoroughly. Remove old polish, trim the nails, and shape them evenly. Push back the cuticles gently and buff the nail surface lightly. Apply a base coat to protect the nails and help the polish last longer.
For materials, you need a deep pine green nail polish, a matte top coat, base coat, and standard nail tools. Apply two thin layers of green polish, letting each layer dry completely. Finish with a matte top coat to remove shine and create a velvety texture.
This design is perfect for everyday wear and professional settings. It pairs well with neutral outfits and earthy colors. To maintain the look, avoid oily products on nails and apply cuticle oil around the nail, not on the surface. Touch up with matte top coat if shine appears over time.

2. Forest Leaf Accent Nail Design
Forest leaf accent nails focus on natural leaf patterns placed on one or two nails while keeping the rest simple. This design adds artistic detail without looking too busy.
Begin with nail preparation by cleaning, shaping, and applying a base coat. Choose a soft or dark green shade for the main nails and a lighter green or nude shade for the accent nail base.
Materials include green nail polishes, a thin nail art brush, dotting tool, top coat, and base coat. Paint all nails except one or two with your chosen green color. On the accent nails, draw small leaf shapes using darker or lighter green shades. You can also use leaf nail stickers if freehand drawing feels difficult.
Seal the design with a glossy or satin top coat. This nail style works well for nature lovers and casual events. To keep the leaf details fresh, apply a thin top coat every few days and avoid harsh cleaning chemicals.

3. Moss Green Textured Nails
Moss green textured nails are inspired by forest floors covered in soft moss. This design adds depth and a unique feel to your manicure.
Preparation is important because textured designs highlight nail flaws. Buff the nails smoothly, clean thoroughly, and apply a strong base coat. Choose a moss green shade that has yellow undertones.
Materials include textured green polish or regular polish mixed with fine acrylic powder, base coat, and top coat. Apply the green polish in thin layers. While the polish is slightly wet, sprinkle acrylic powder lightly to create texture. Let it dry fully before sealing with a clear top coat.
This design looks artistic and earthy. It is best for medium to long nails where texture can stand out. Maintenance includes avoiding picking at the surface and using gloves during household work to protect the texture.

4. Dark Forest Ombre Nails
Dark forest ombre nails blend different green shades to create a soft, layered forest look. This design mimics the depth of trees fading into shadows.
Start with nail preparation by cleaning, shaping, and applying a base coat. Choose two or three green shades, such as deep forest green, olive green, and soft sage.
Materials include a makeup sponge, green polishes, base coat, and top coat. Paint the base color first, then dab the sponge with two green shades and gently press onto the nail to blend them. Repeat until the gradient looks smooth.
Finish with a glossy top coat to blend the colors together. This design is stylish and modern, suitable for special occasions or seasonal fashion. To maintain, reapply top coat every few days and keep nails moisturized.

5. Forest Green Nails with Gold Details
This design combines forest green polish with gold accents for a luxurious nature-inspired look. The gold represents sunlight filtering through trees.
Prepare the nails carefully, focusing on clean cuticles and smooth surfaces. Apply a base coat before color application.
Materials include forest green polish, gold foil or gold striping tape, tweezers, and top coat. Apply two coats of green polish. Once dry, place small gold details on one or two nails or create thin lines across the nail.
Seal everything with a clear top coat. This style works well for weddings, parties, or festive events. Maintain by avoiding water exposure for long periods and gently pressing gold pieces back into place if needed.

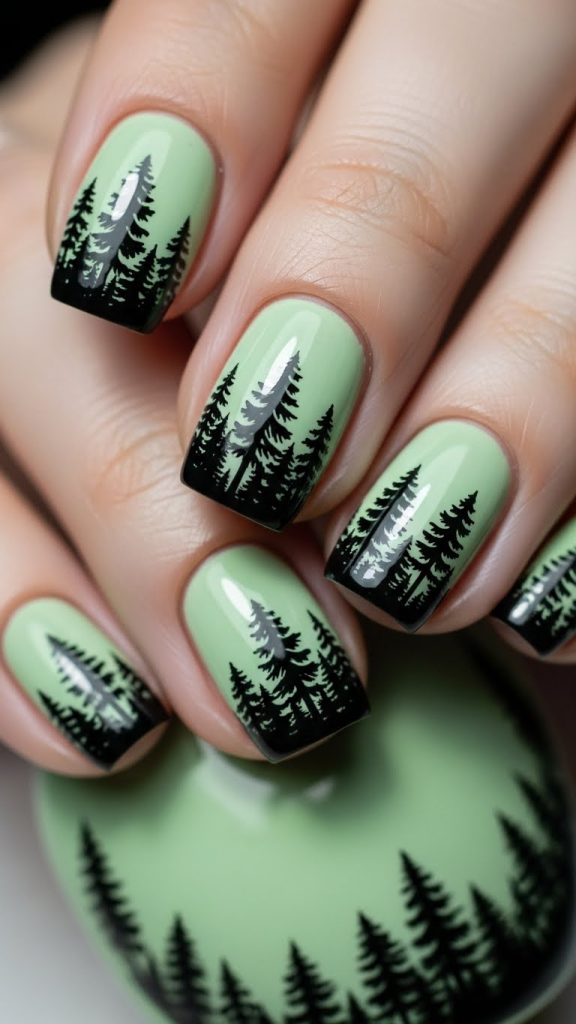
6. Woodland Tree Silhouette Nails
Tree silhouette nails capture the beauty of tall forest trees in a simple yet striking way.
Preparation includes nail cleaning, shaping, and applying a base coat. Choose a lighter green or misty gray-green background color.
Materials needed are black or dark green polish, thin nail art brush, base coat, and top coat. Paint the base color first. Once dry, draw thin tree silhouettes starting from the cuticle upward. Keep the design minimal for best results.
Finish with a glossy top coat. This design is artistic and calm, ideal for creative personalities. To preserve the details, apply top coat every few days and avoid scratching the surface.
7. Olive Green Minimal Forest Nails
Olive green minimal nails are perfect for those who want a subtle forest-inspired look.
Start with basic nail preparation. Shape nails neatly and apply a base coat. Choose a muted olive green polish.
Materials include olive green polish, base coat, and top coat. Apply two thin layers of polish and finish with a glossy or satin top coat.
This design suits office wear and daily use. It pairs well with neutral clothing. Maintenance is easy. Keep nails hydrated and avoid chipping by wearing gloves during chores.

8. Fern Pattern Forest Nails
Fern patterns reflect delicate forest plants and add softness to nail art.
Prepare nails properly and choose a light green or nude base color. Apply a base coat before painting.
Materials include green polish, thin brush, dotting tool, and top coat. Paint the base color, then draw small fern-like lines branching outward. Keep patterns light and balanced.
Seal with top coat. This design is elegant and natural, perfect for spring and summer. Maintain by avoiding heavy pressure on nails and applying top coat as needed.

9. Dark Green Glossy Forest Nails
Glossy dark green nails offer a bold forest look with a polished finish.
Begin with nail preparation and base coat application. Choose a deep green polish with rich pigment.
Materials needed are green polish, base coat, and high-shine top coat. Apply two coats of polish and finish with a glossy top coat.
This style is timeless and suits all nail lengths. It requires minimal upkeep. Reapply top coat weekly to maintain shine and prevent chipping.

10. Forest-Inspired Mixed Green Nail Set
This design uses different green shades and patterns across all nails for a creative forest theme.
Prepare nails carefully and plan your design before starting. Choose several green shades and textures.
Materials include multiple green polishes, nail art tools, base coat, and top coat. Paint each nail differently, such as solid green, leaf patterns, ombre, or textured finishes.
Seal all nails with top coat. This design is expressive and trendy, ideal for creative individuals. Maintenance includes gentle care and regular touch-ups to keep each nail looking fresh.


Leave a Reply