Creating Christmas themed nails can add a wonderful festive touch to your holiday season, even if you prefer short nails. Many people assume that elaborate seasonal manicures require long nails, but short nails can be just as expressive, charming and creative when the right designs, colors and preparation are used. This detailed blog post presents ten Christmas nail ideas specifically tailored for short nails. Each idea includes preparation steps, required materials and a full explanation of how to apply and personalize the design at home. Whether you enjoy classic red tones, soft winter themes or playful festive patterns, these ideas help you achieve a polished look that captures the joy of the holidays.
Before diving into the designs, it is important to prepare your nails properly. Good preparation ensures that your manicure lasts longer, the polish looks smooth and the designs appear clean. Start by trimming and filing your nails to an even shape. For short nails, a soft square or rounded square shape works well because it creates a neat and compact canvas that complements most Christmas designs. Gently push back your cuticles without cutting too deeply, as this reduces the risk of irritation. Buff the surface lightly to remove any oil and create a matte base that grips the polish. After this, wash your hands and dry them fully. Apply a base coat to protect your nails from staining, especially when using red or green polishes, which can sometimes discolor the natural nail. With your nails prepped and ready, you can begin exploring these ten Christmas nail concepts.
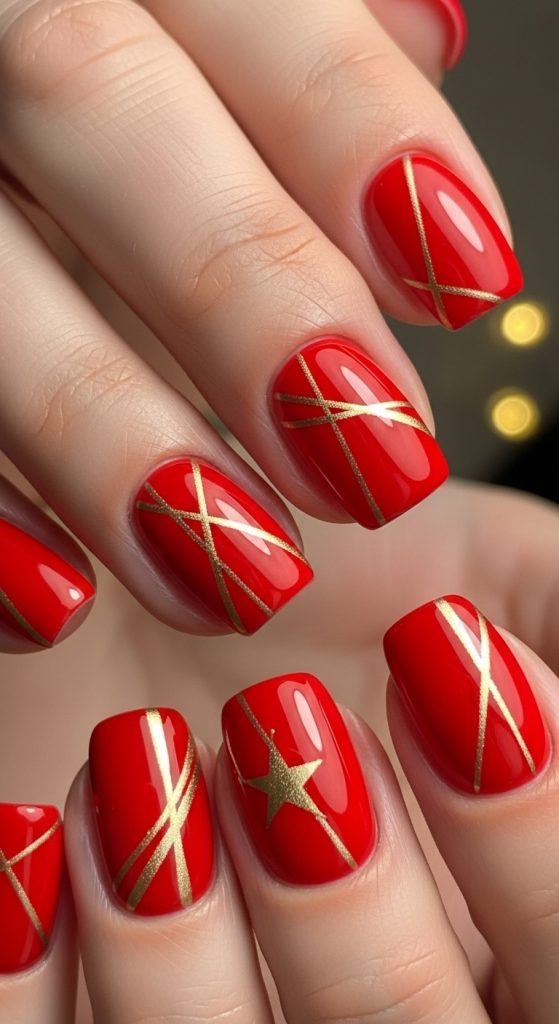
1 Classic Red and Gold Short Christmas Nails
Classic red and gold nails are a timeless Christmas combination that suit short nails beautifully due to their bold contrast and festive charm. To start this style, you will need a vibrant red nail polish, a metallic gold polish, a fine detail brush, top coat and a base coat. Begin with your normal nail preparation, ensuring the surface is smooth and even. Apply a layer of base coat and allow it to dry completely. Next, paint two coats of the bright red polish onto each nail. Short nails often look more polished when the base color is evenly applied, so allow each coat to dry fully before adding the next.
Once the red color has set, you can introduce gold details. For a simple design, add a thin gold stripe either at the base of the nail near the cuticle or across the tip. This minimalist detail enhances the short nail shape without overwhelming it. For an alternate look, you may apply gold glitter polish over one accent nail or add tiny gold dots using a dotting tool. Finish with a glossy top coat to protect the design and add shine. This classic combination creates a rich holiday feel that is both easy to apply and visually striking on short nails.
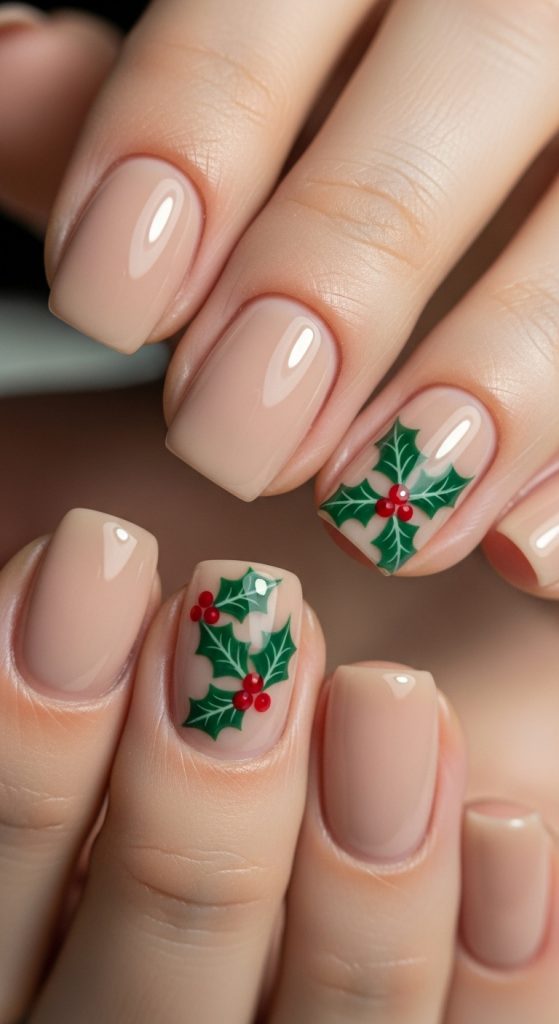
2 Green Holly Accent Nails
Green holly accent nails are a charming way to incorporate traditional Christmas elements while still keeping your manicure elegant and subtle. This design requires a white or nude base color, a green polish, a red polish, a dotting tool and a fine nail art brush. Begin with your base coat and allow it to dry. Apply two coats of the white or nude shade to every nail, choosing a tone that will allow the holly artwork to stand out clearly. The light background helps keep short nails appearing clean and bright.
Once all nails are dry, select one or two nails on each hand to become accent nails. Using the green polish, paint two or three small holly leaves on the chosen nails. Short nails provide a compact space, so it is best to keep the leaves small and simple. A fine nail brush helps achieve the pointed leaf tips and curved edges. After completing the leaves, switch to the red polish and use a dotting tool to create small berries grouped near the leaf base. The contrast of green and red against the pale background highlights the holiday theme without crowding the nail. Finish the look with a top coat to preserve the holly artwork and maintain a smooth, glossy finish suitable for daily wear throughout the season.
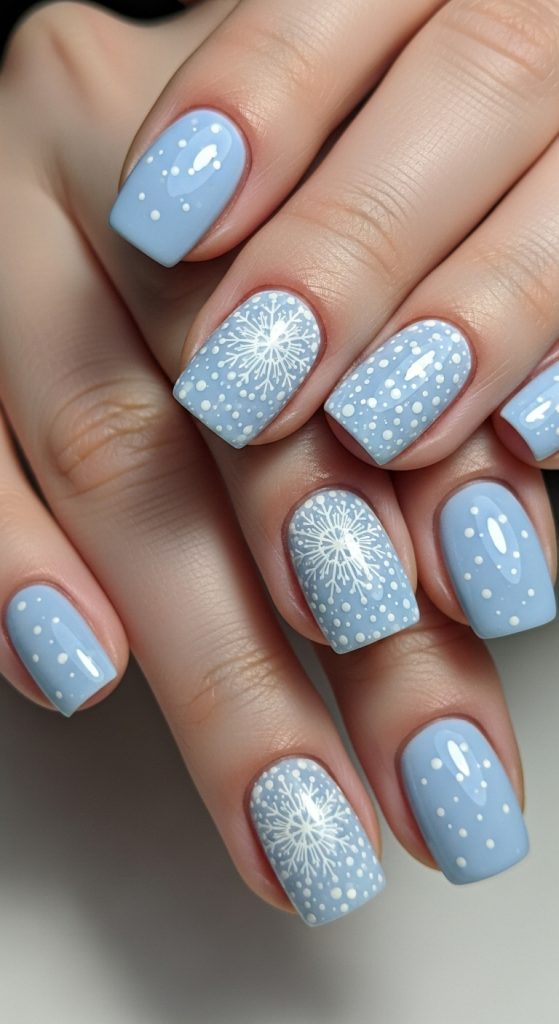
3 Snowflake Short Nails
Snowflake nails are a winter favorite because they are delicate, detailed and elegant on short nails. This design begins with a cool toned base color such as pale blue, silver, icy white or soft gray. You will also need white nail polish, a thin striping brush and a top coat. Start with your usual preparation steps, then apply your base coat. Once dry, paint two coats of your chosen background shade. Light blue or soft gray often emphasize the snowy effect beautifully on short nails.
To create the snowflakes, dip a thin nail art brush into the white polish and draw small intersecting lines resembling star shapes. Begin with one vertical line and one horizontal line that cross at the center. Then add two diagonal lines to form an eight pointed snowflake. Add tiny branch details at the ends of each line to mimic the intricate nature of real snowflakes. Because short nails have limited space, keep the snowflakes small and centered. You may choose to place a single snowflake on each nail or only on accent nails. Add tiny white dots around the snowflake to resemble falling snow. Once the design has dried fully, apply a clear top coat for a glass like finish that protects the crisp lines and adds extra winter brilliance.
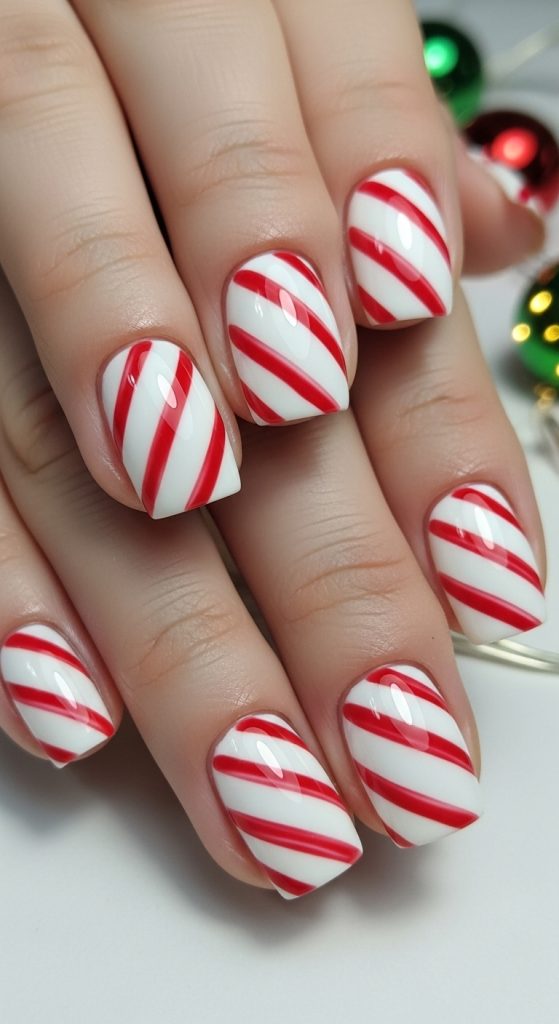
4 Candy Cane Striped Nails
Candy cane striped nails are bold, festive and perfect for short nails because the repetitive pattern visually elongates the nail surface. You will need white polish, red polish, striping tape or a thin striping brush and a top coat. Begin with a base coat to protect the nail and enhance the brightness of the white polish. Apply two coats of white polish and allow them to dry thoroughly. The white base creates the foundation for the candy cane stripes.
Once the nails are dry, apply thin strips of tape diagonally across each nail, leaving narrow gaps for the red polish. Ensure that the tape is pressed down firmly to prevent bleeding. Paint red polish over the entire nail, covering both the tape and exposed areas. Remove the tape carefully before the red polish dries, revealing clean white stripes. If you prefer hand painted stripes, use a steady striping brush dipped in red polish and paint diagonal lines manually. Short nails benefit from slightly thinner stripes, which prevent the design from looking crowded. Finish the look with a top coat to smooth the surface and add shine. Candy cane stripes bring a cheerful and recognizable holiday feel to short nails, making them an ideal quick yet eye catching design.
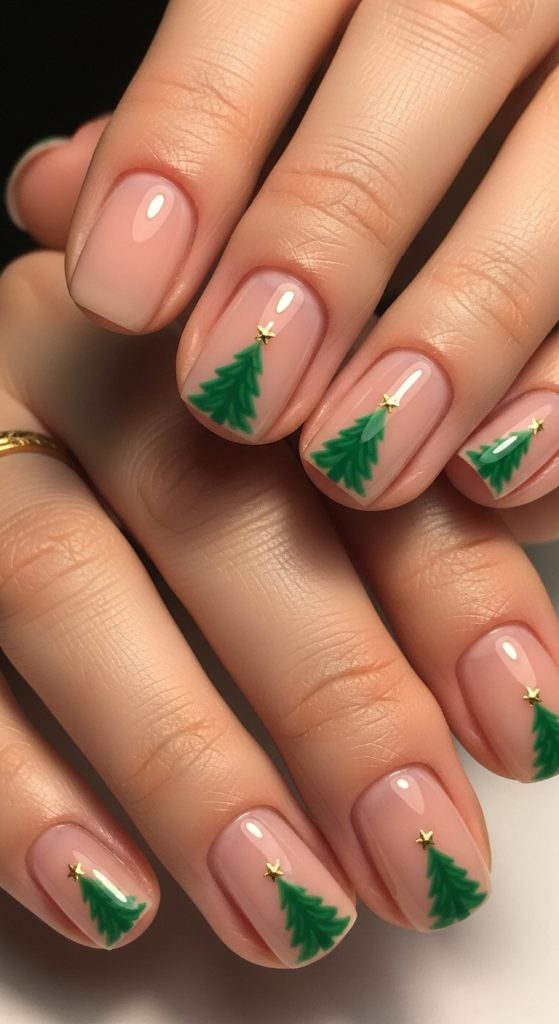
5 Short Nails with Christmas Tree Tips
A Christmas tree inspired tip design is an easy way to create a playful holiday manicure that suits short nails. To create this look, gather a nude or pale pink base polish, green polish, gold polish, a thin nail art brush and a top coat. Begin with your base layer, applying two coats of a natural shade that blends seamlessly with your nail tone. This neutral background allows the green tree tip to stand out clearly.
Once the base is dry, dip your thin striping brush into the green polish and draw a triangular shape at the tip of each nail. Keep the triangles small and pointed, as short nails require compact designs that do not overwhelm the available space. You may add small horizontal strokes inside the triangular outline to create the impression of tree layers. After the green tip has dried, dip a small dotting tool into gold polish and place a single dot at the top of the tree, symbolizing a star. If desired, add one or two additional gold dots inside the tree to resemble ornaments. Complete the look with a glossy top coat to seal the design. This Christmas tree tip style is simple yet festive, making it a fun choice for holiday gatherings or seasonal daily wear.
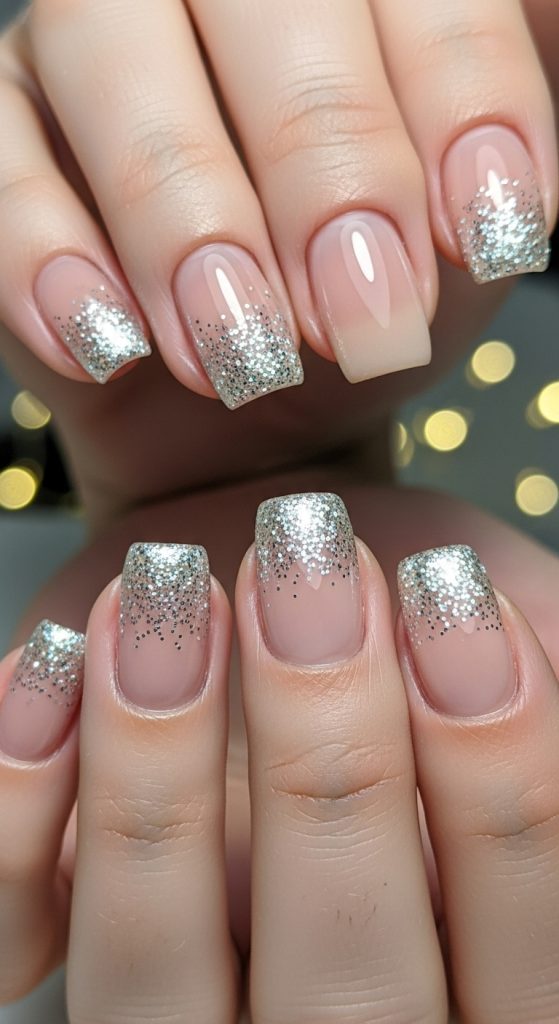
6 Glitter Gradient Short Christmas Nails
Glitter gradient nails add sparkle and dimension to short nails without requiring complex artistry. This design is particularly effective for holiday celebrations because glitter reflects light beautifully and enhances simple colors. To achieve this style, choose a base color such as red, nude, green or white, and select a loose glitter polish or a fine glitter top coat. You will also need a sponge applicator, a base coat and a finishing top coat.
Begin by preparing your nails and applying a base coat. Apply two coats of your chosen solid color and let them dry fully. Once the base is set, apply the glitter polish to a small makeup sponge. Using the sponge allows the glitter to be placed more densely without adding too much liquid polish. Dab the glitter onto the tips of the nails, concentrating the majority at the edge and fading upward toward the center of the nail. This creates a smooth gradient effect that makes short nails appear longer and more dimensional. Apply several layers if you want a stronger glitter presence. After the gradient is complete and dry, apply a thick top coat to seal the glitter and create a smooth finish. This look is versatile, festive and ideal for anyone who prefers an effortless yet glamorous Christmas manicure.
7 Red Sweater Texture Nails
Sweater texture nails are a cozy and seasonal choice that looks beautiful on short nails during Christmas. For this design, you will need a matte red polish, acrylic powder or textured powder, a fine nail art brush, a base coat and a top coat. Begin with your nail preparation, then apply a layer of base coat and two layers of matte red polish. The matte finish is important because it enhances the soft, knitted appearance of the sweater pattern.
Once the nails are dry, use a fine brush dipped in red polish to draw cable knit inspired patterns. These may include simple vertical lines, small V shapes or braided patterns resembling classic winter sweaters. While the design is still wet, sprinkle a small amount of acrylic powder over the painted pattern. The powder sticks to the polish and creates a raised, textured effect. Allow the powder to set for a few minutes before brushing off the excess. Because short nails have limited space, focus on a few simple elements rather than large complex patterns. You may choose to apply the textured pattern only on accent nails to keep the look balanced. Finish with a matte top coat to preserve the sweater effect. This design brings warmth and charm to your festive manicure.

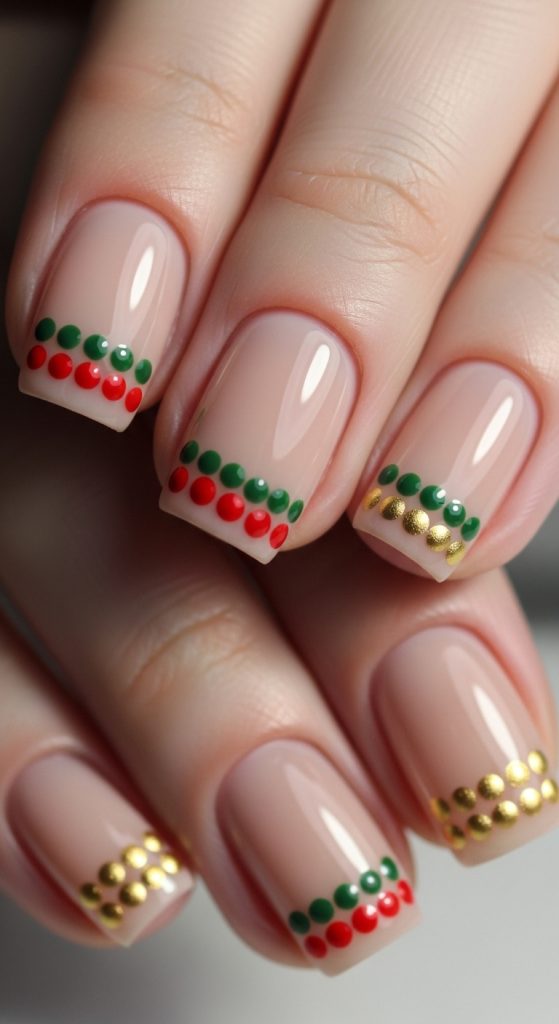
8 Minimalist Christmas Dot Art Nails
Minimalist dot art nails are a simple yet elegant choice for short nails, especially during the Christmas season. This style requires a white or nude base polish, red polish, green polish, gold polish, a dotting tool and a top coat. Begin with your base preparation routine, then apply two coats of the white or nude shade. A neutral base helps the dot art appear neat and modern.
Once the base polish is dry, use the dotting tool to create small red and green dots along either the base or the tip of the nail. You may alternate colors or keep them symmetrical. Short nails benefit from fewer dots arranged in a clean pattern, such as a single row of alternating red and green circles. To incorporate a subtle festive element, add a few gold dots among the colored ones. These add brightness and balance the holiday palette without making the nails look crowded. Dot art is easy to control and approachable for beginners because it does not require precise lines or complex shapes. After finishing the pattern, apply a glossy top coat to seal the design and ensure the dots remain smooth. This minimalist design is suitable for those who prefer a subtle, modern approach to Christmas themed nails.
9 Short Nails with Gift Box Accent Design
Gift box accent nails add a playful and festive touch that suits short nails especially well. To create this look, gather red polish, green polish, gold polish, white polish, a striping brush and a dotting tool. Begin with the standard preparation, then apply two coats of a solid color such as red or green on all nails. These bold shades create a strong holiday background that ties the design together.
Choose one nail on each hand as your accent nail. Using the striping brush dipped in white or gold polish, paint a vertical stripe and a horizontal stripe across the accent nail, forming the appearance of ribbon wrapped around a gift. Make sure the lines intersect at the center. Next, use the dotting tool or a small detail brush to draw a simple bow shape at the point where the stripes meet. The bow can be created using two teardrop shapes and a small dot in the middle. Short nails make this design especially charming because the compact size resembles a miniature gift box. Keep the lines thin and neat for the best visual effect. Finish with a top coat to smooth the surface and add shine. This cheerful design is perfect for holiday events or family celebrations.

10 White Winter Frost Short Nails
White winter frost nails create a soft and elegant look ideal for short nails during the Christmas season. This design uses white polish, silver glitter polish, a thin nail art brush and a top coat. Begin with your base coat, then apply two coats of pure white polish. The solid white background represents snow and helps the frost detailing stand out clearly.
After the white base has dried, use a thin brush dipped in silver glitter polish to create frosty patterns starting from the tip or cuticle. These may include small streaks, feathery lines or icy textures resembling frost on a window. Focus on creating soft, irregular strokes that create a natural snowy effect. Short nails benefit from delicate designs that do not overwhelm the small surface area. To enhance the frosty appearance, lightly dab a small amount of glitter near the tips, allowing it to fade gently toward the center. Finish the look with a clear top coat to seal the glitter and add a glossy finish. This design pairs well with winter outfits and gives a polished, seasonal impression suitable for both formal and casual holiday events.


Leave a Reply