

Air dry clay is one of the easiest and most enjoyable materials for creative projects at home. It does not require a kiln or oven to harden, which makes it perfect for beginners, children, and hobby artists. You only need simple tools and a little patience while the clay dries naturally in the air. Air dry clay is soft, smooth, and easy to shape. It can be rolled, pressed, carved, and painted once it dries. Because of these qualities, it is ideal for making decorations, gifts, home accessories, and small functional items.
Before starting any project, it is important to understand how air dry clay works. It usually takes 24 to 72 hours to dry completely, depending on thickness and humidity. Always work on a clean surface and keep unused clay sealed in an airtight bag to prevent it from drying out. Use water lightly to smooth cracks, and allow each piece to dry fully before painting. Acrylic paints work best, and sealing the finished item with varnish helps protect it.
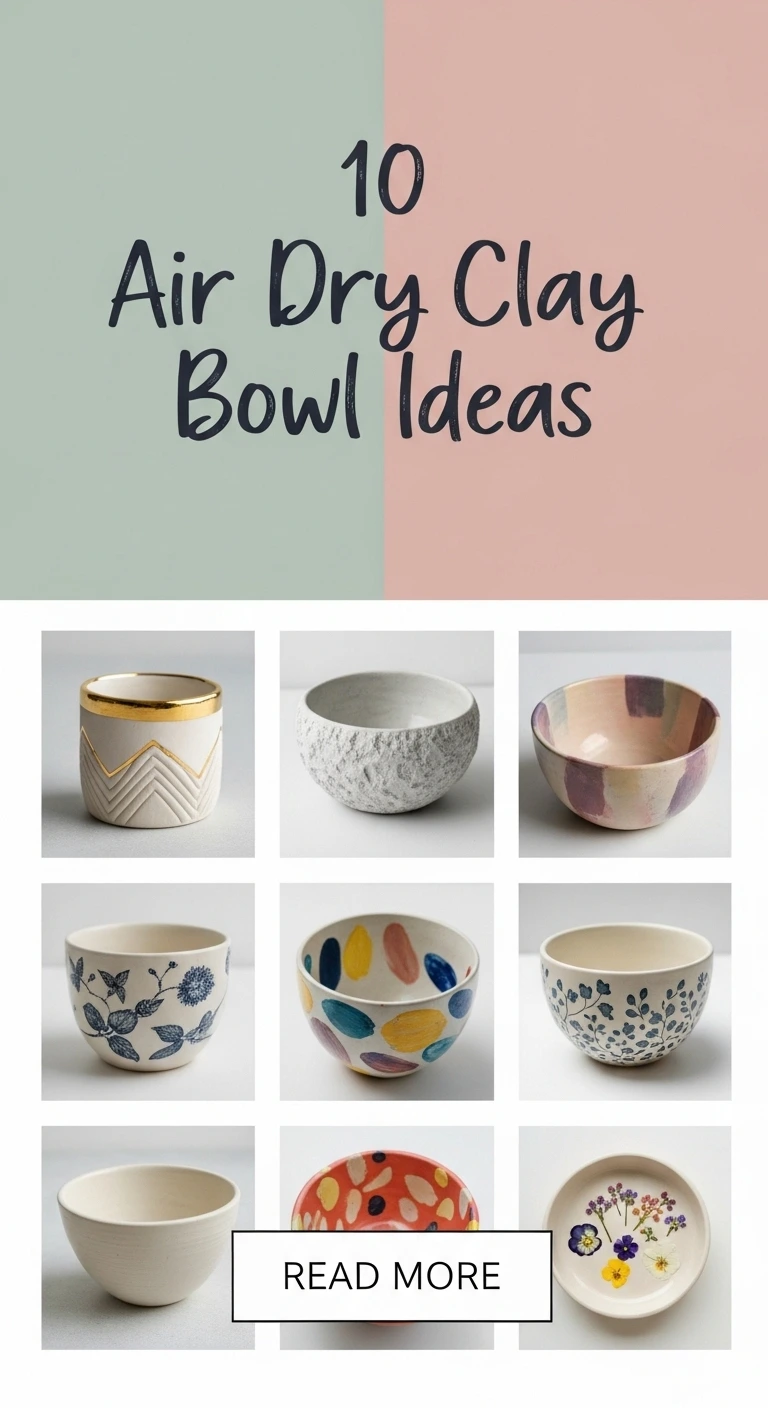
Below are ten easy air dry clay project ideas with detailed preparation, materials, and step by step guidance.
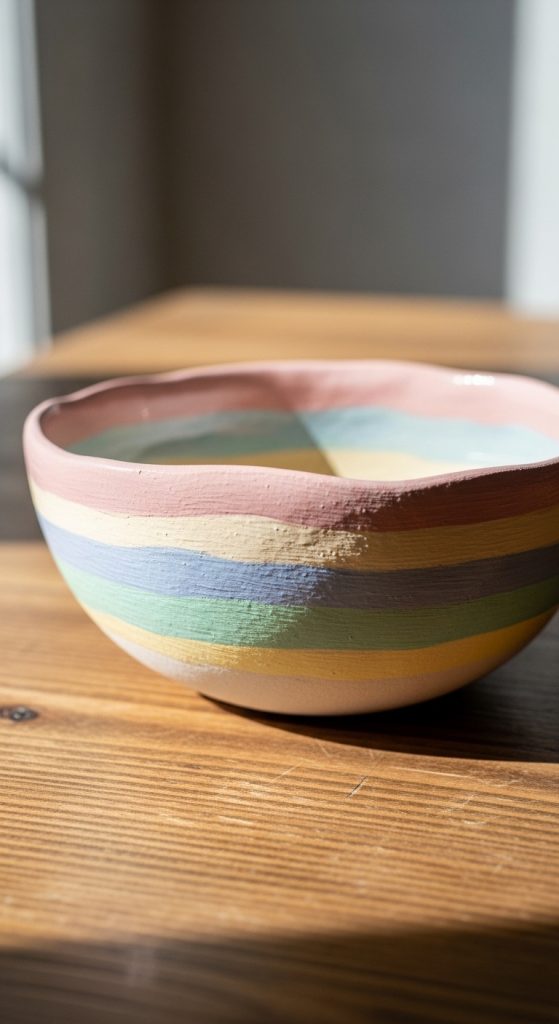
1. Decorative Clay Bowls
Decorative clay bowls are one of the simplest and most useful air dry clay projects. They can hold jewelry, keys, coins, or simply act as beautiful display pieces. To prepare, gather air dry clay, a rolling pin, a small bowl to use as a mold, plastic wrap, a knife or clay cutter, sandpaper, acrylic paint, and clear varnish.
Start by rolling the clay to about one quarter inch thickness. Make sure the surface is even. Cover the outside of your mold bowl with plastic wrap so the clay does not stick. Carefully place the rolled clay over the covered bowl and gently press it down to shape it. Trim the edges with a knife to create a clean circle or experiment with wavy or uneven edges for a natural look.
Let the clay dry for 24 to 48 hours. Once dry, remove it from the mold and lightly sand any rough edges. Paint your bowl with acrylic paints. You can use solid colors, simple patterns, or soft watercolor effects. After the paint dries, apply a clear varnish to protect the surface.
When using the bowl, remember that most air dry clay is not waterproof unless sealed well. These bowls are best for dry items. This project is perfect for beginners because it teaches rolling, shaping, trimming, drying, sanding, and painting in one simple activity.
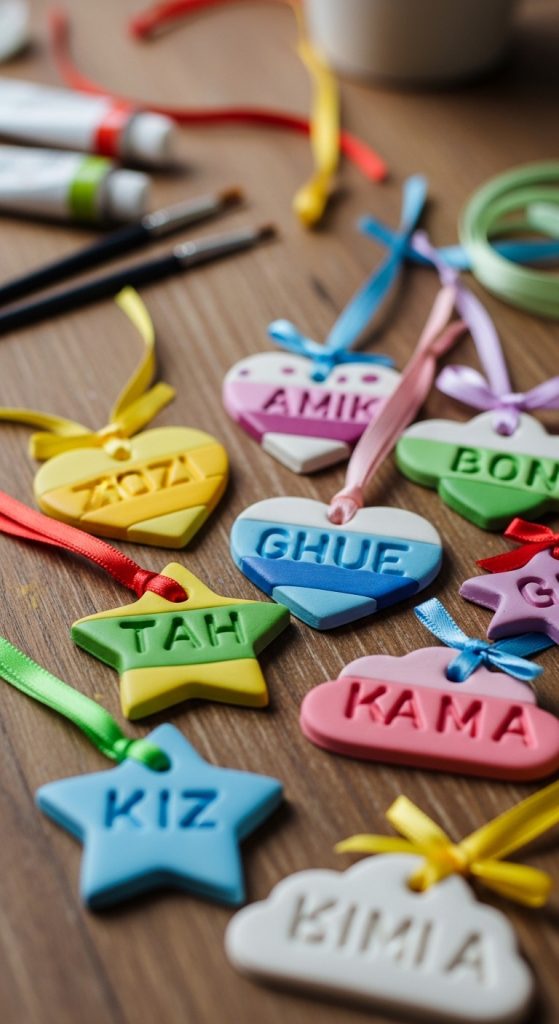
2. Personalized Name Tags
Personalized name tags are great for gifts, party favors, school bags, or room decor. They are easy to make and allow you to practice lettering and small details. For this project, you will need air dry clay, a rolling pin, alphabet stamps or a toothpick, a straw, acrylic paints, ribbon or string, and varnish.
Roll the clay flat on a clean surface. Cut out small rectangles, circles, or fun shapes like stars or hearts. Use alphabet stamps to press names into the clay. If you do not have stamps, you can carefully write letters using a toothpick or blunt knife. Make sure the letters are deep enough to remain visible after drying.
Use a straw to create a hole at the top if you plan to hang the tag. Allow the pieces to dry completely, turning them gently halfway through to avoid warping. Once dry, sand the edges if needed.
Paint the entire tag with a base color. After it dries, use a smaller brush to paint inside the letters for a bold look. Seal with varnish to protect the paint. Thread ribbon or string through the hole.
These name tags are lightweight and attractive. They can be used on gift bags, backpacks, storage baskets, or even as holiday ornaments. This project helps improve fine motor skills and creativity while creating something meaningful and personal.
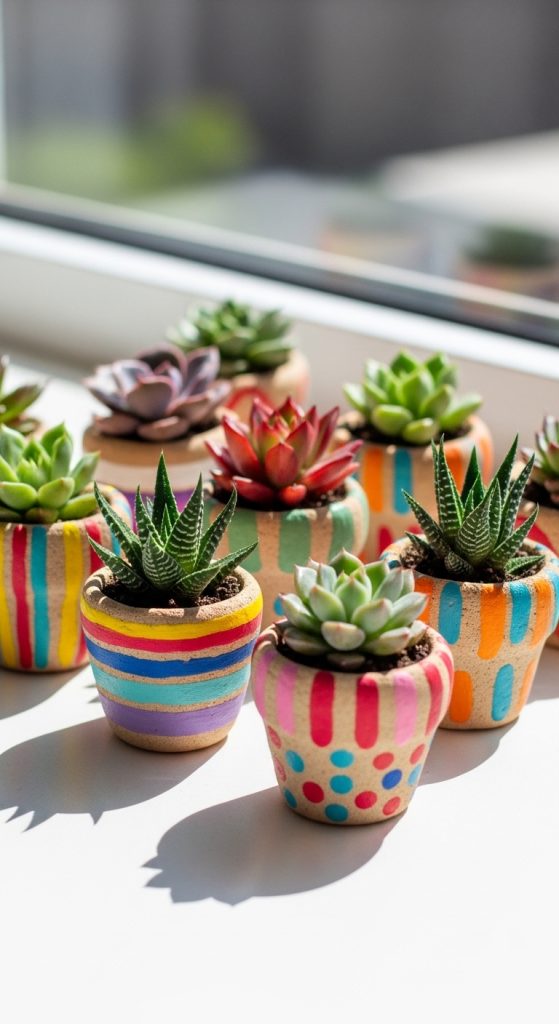
3. Clay Plant Pots for Small Succulents
Mini clay plant pots are charming and perfect for small succulents or decorative plants. For this project, gather air dry clay, a small cup for shaping, a knife, sandpaper, acrylic paint, and waterproof sealant.
Begin by forming a ball of clay. Press your thumb into the center and slowly pinch the sides outward while turning the clay in your hand. This technique is called pinch pot shaping. Keep the walls even, about one quarter inch thick. You can also shape the clay around the outside of a small cup lined with plastic wrap.
Smooth the surface with slightly damp fingers. Create a small drainage hole at the bottom using a pencil. Allow the pot to dry slowly and evenly. Thicker pieces may take up to 72 hours.
After drying, sand rough areas carefully. Paint the pot in bright colors, soft pastels, or simple patterns like dots and stripes. Once the paint dries, apply a waterproof sealant inside and outside to protect it from moisture.
These pots are best for decorative use or plants that require little water, like succulents. If you plan to water frequently, consider placing a plastic liner inside. Making plant pots teaches shaping, smoothing, and working with thicker clay pieces.
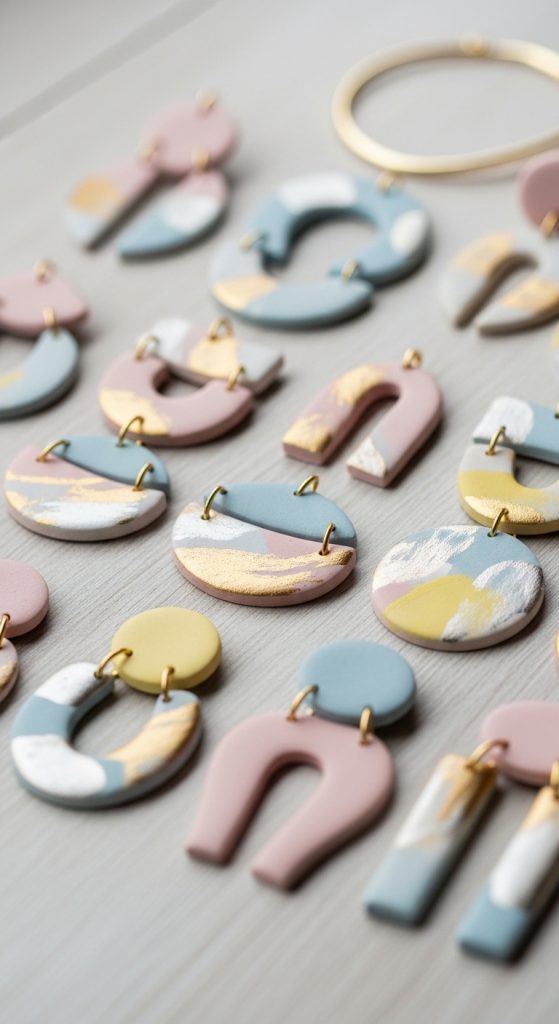
4. Handmade Clay Jewelry
Air dry clay is perfect for lightweight jewelry such as earrings, pendants, and bracelets. You will need clay, a rolling pin, small cookie cutters or a knife, a needle tool, sandpaper, acrylic paint, jewelry hooks, jump rings, and pliers.
Roll the clay thin, about one eighth inch thick. Cut out small shapes such as circles, ovals, leaves, or abstract designs. Use a needle tool to create small holes where you will attach hooks or rings. Keep the pieces balanced in size and thickness so they dry evenly.
Let the shapes dry flat on a smooth surface. Turn them gently after several hours. Once fully dry, sand edges until smooth. Paint with acrylics in solid colors or modern designs. You can also leave the clay natural and seal it with clear varnish for a minimal look.
After sealing, attach jump rings and hooks using pliers. Make sure all connections are secure. Because air dry clay is lightweight, it is comfortable for earrings.
This project is ideal for creative expression. You can experiment with shapes, colors, and patterns. It also makes thoughtful handmade gifts. Practice is important, so start with simple shapes before trying more complex designs.
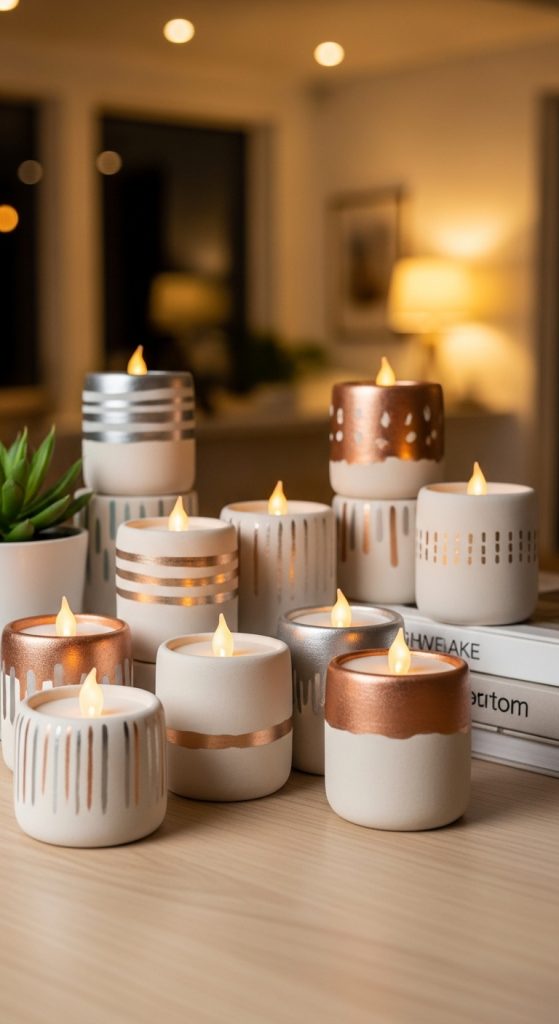
5. Clay Candle Holders
Clay candle holders add warmth and charm to any room. They are simple to create but require careful thickness for safety. Gather air dry clay, a rolling pin, a small glass candle holder for measuring, a knife, sandpaper, paint, and sealant.
Roll the clay to about one quarter inch thickness. Cut a circle larger than the base of your candle holder. Form a short wall around the edge by rolling a long clay strip and attaching it securely with gentle pressure and a little water.
If making a tealight holder, press a real tealight candle gently into the center to create the correct space, then remove it before drying. Make sure the walls are thick and stable. Allow the piece to dry fully.
After drying, sand the edges and paint as desired. Neutral tones create a modern look, while metallic paints give a festive feel. Seal the holder to protect the surface.
For safety, it is best to use LED candles with air dry clay holders, since real flames can heat the clay. If using real candles, ensure the flame does not touch the clay directly. This project teaches construction techniques and careful measuring.
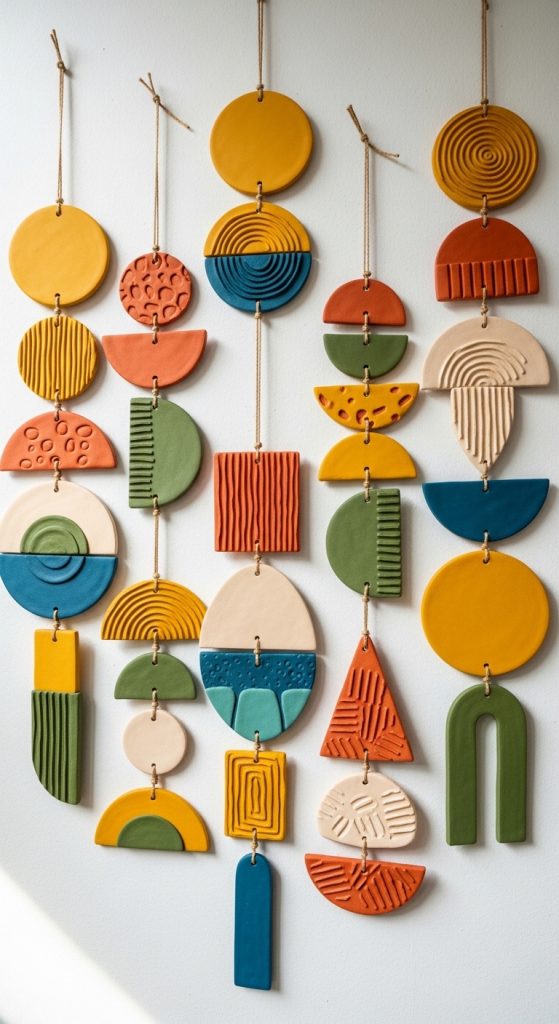
6. Wall Hanging Decorations
Wall hangings made from clay can add personality to any space. You will need clay, a rolling pin, string, a straw, stamps or textured fabric, paint, and varnish.
Roll the clay flat and cut into shapes like circles, arches, or abstract forms. Use textured fabric, lace, or stamps to press patterns into the surface. Make holes at the top using a straw for hanging.
Allow each piece to dry completely. Once dry, sand lightly. Paint in coordinated colors to match your room decor. You can create a series of pieces connected by string to form a hanging banner.
Thread string through the holes and tie secure knots. Arrange the shapes in a balanced pattern before hanging. You may attach the strings to a wooden stick for a modern wall art style.
These decorations are lightweight and customizable. You can create seasonal themes, inspirational word pieces, or simple geometric art. This project encourages creativity in design and layout while practicing surface texture techniques.
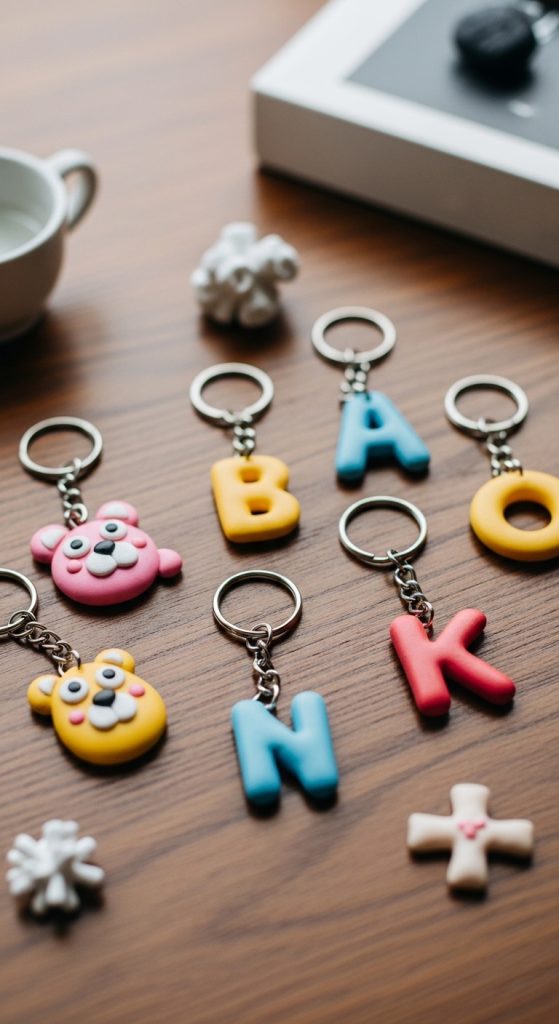
7. Clay Keychains
Clay keychains are practical and easy to make. They are perfect for beginners and children with supervision. Materials include air dry clay, a rolling pin, cookie cutters, a straw, paint, key rings, and varnish.
Roll the clay to medium thickness. Cut out shapes such as hearts, circles, animals, or initials. Use a straw to create a hole near the top. Make sure the hole is large enough for a metal ring.
Let the shapes dry fully, flipping gently halfway through. Sand edges for smoothness. Paint with bright colors or simple designs. You can add names, small drawings, or patterns.
After sealing with varnish, attach a metal key ring through the hole. Check that it moves freely and does not crack the clay.
These keychains make thoughtful handmade gifts. They are light but durable when sealed properly. Avoid dropping them on hard surfaces, as air dry clay can break if hit strongly. This project is simple yet satisfying and allows room for endless creative designs.
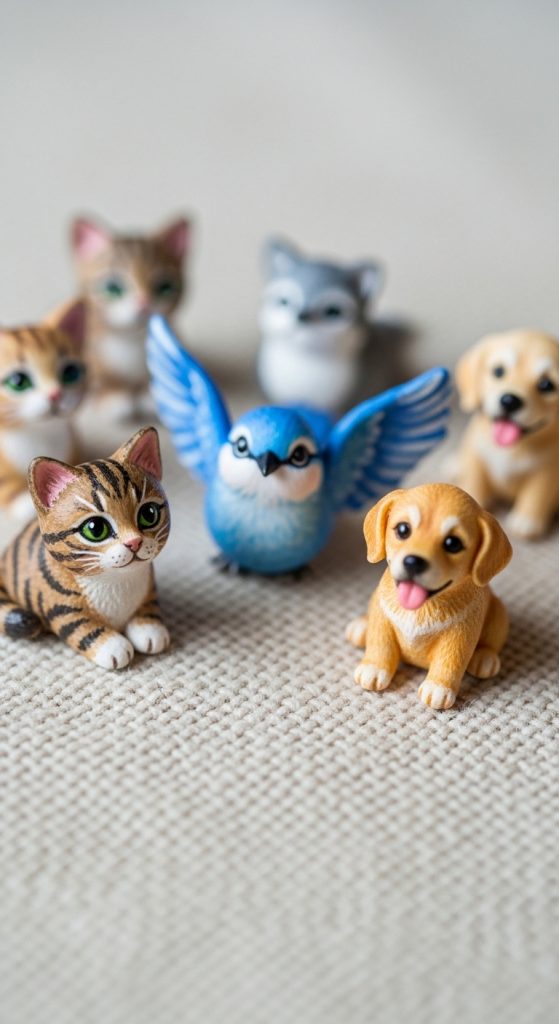
8. Miniature Animal Figurines
Creating miniature animal figurines is a fun way to practice shaping and detailing. You will need clay, a toothpick, water, paint, and varnish.
Start by shaping a small ball for the body. Add smaller pieces for the head, legs, ears, or tail. Use a toothpick to attach parts securely by gently scoring the surfaces and adding a small amount of water before pressing together.
Keep the figurine small to avoid long drying times and cracking. Smooth connections carefully with damp fingers. Allow it to dry slowly in a cool place.
Once fully dry, paint the figurine using fine brushes. Add small details like eyes, fur patterns, or facial expressions. Seal with varnish for protection.
These figurines are decorative and can be used for display or imaginative play. Practice makes a big difference in this project. Start with simple animals like cats or birds before trying more complex shapes. This project improves hand control and understanding of three dimensional form.
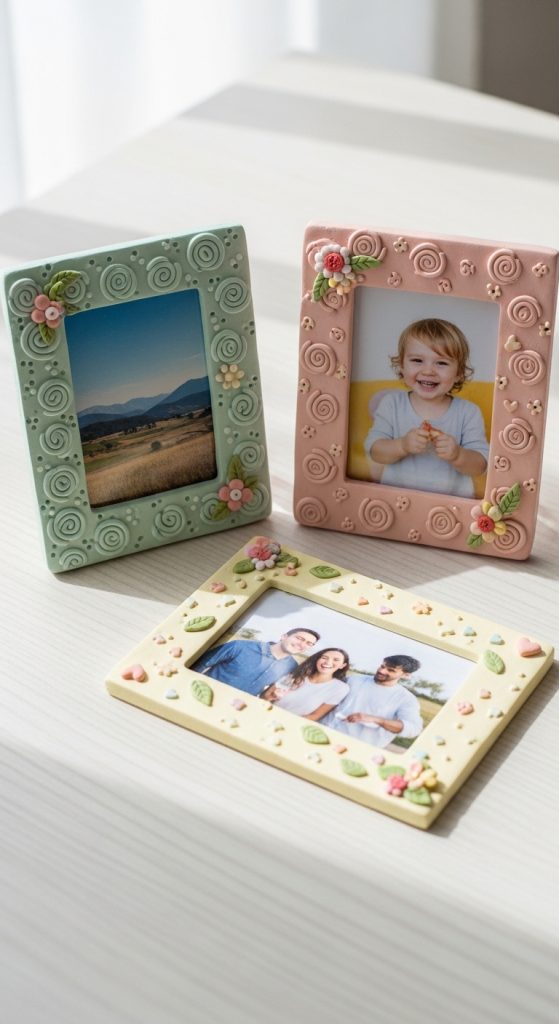
9. Clay Photo Frames
Handmade clay photo frames are meaningful and customizable. Gather clay, a rolling pin, a knife, a ruler, cardboard, glue, paint, and varnish.
Roll the clay flat and cut a rectangle larger than your photo. Cut a smaller rectangle inside to create the window opening. Smooth edges carefully. You can decorate the border with small clay shapes, pressed textures, or carved designs.
Allow the frame to dry flat. Once dry, sand lightly and paint in colors that match your decor. Seal with varnish.
Attach a piece of sturdy cardboard to the back using strong glue, leaving one side open to insert the photo. You can also attach a small folded cardboard stand at the back to help it stand upright.
These frames make excellent gifts for family and friends. They combine design, structure, and decoration skills. Keep the frame thick enough to prevent bending but not too thick to avoid long drying times.
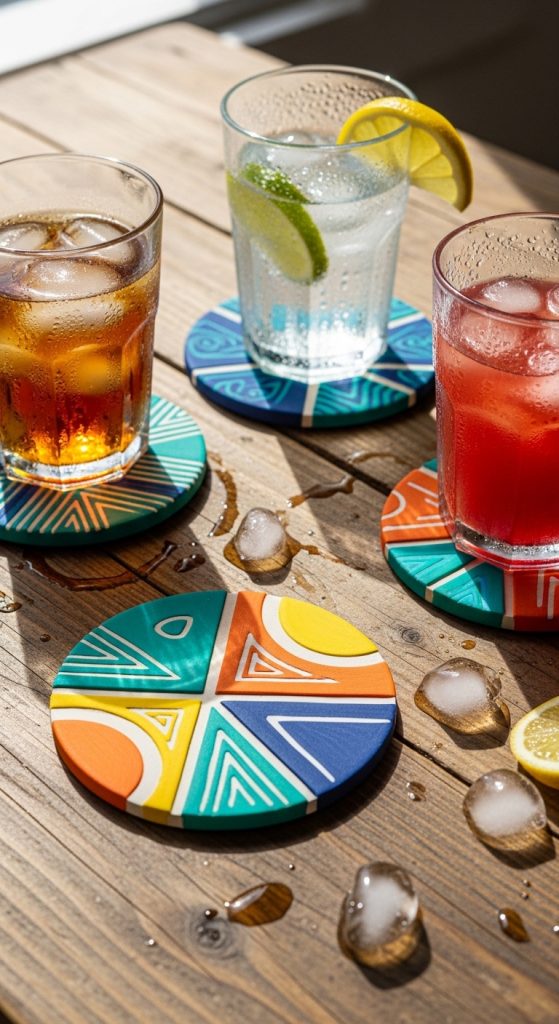
10. Clay Coasters
Clay coasters are practical home items and simple to create. You will need clay, a rolling pin, a round cutter or glass, sandpaper, acrylic paint, and waterproof sealant.
Roll the clay evenly to about one quarter inch thickness. Cut circles using a glass or cutter. Smooth the edges with damp fingers. You can press textures into the surface using fabric or stamps for added design.
Let the coasters dry completely, flipping halfway through. Sand lightly to remove rough areas. Paint in solid colors, geometric patterns, or simple designs. After the paint dries, apply several layers of waterproof sealant to protect against moisture.
Allow the sealant to cure fully before use. These coasters work best for cold drinks. Avoid placing very hot cups directly on them unless well sealed.
Making coasters teaches consistency in size and thickness. When completed properly, they are both decorative and functional. This project is ideal for beginners who want to create useful household items while practicing clay handling and finishing techniques.
Air dry clay projects are enjoyable, affordable, and suitable for all skill levels. With proper preparation, patience during drying, and careful sealing, you can create beautiful and lasting handmade pieces for your home or as gifts.


Leave a Reply